Categories
Greenhouse News

Farm Biosecurity

Be aware of biosecurity threats


Several issues ago I posted an article pertaining to suspected hormone damage on tomato plants.  A question was raised: “Are you confident that the suspected hormone damage could not be a potential biosecurity issue – e.g. a virus? Should this be reported to MPI and have a sample assessed?”

In this case I was 99.999% positive it was hormone damage that had caused the issue in the tomato plants.  However, the question raised did get me thinking of what are the processes to go through if I, or a grower, do come across a potential biosecurity risk.   Even though it is very rare, to understand the process is important.

Below is a fact sheet provided by TomatoesNZ, it is available on their website.  This factsheet has very good information of how to prevent a biosecurity risk, including using quality seedlings, how to keep your greenhouse clean and how to reduce your risk.


Farm biosecurity for indoor tomato growers

What is Farm Biosecurity?

It has been estimated that plant pests are responsible for up to 15% loss in potential farm income.  Controlling pests and diseases to minimise crop loss could be considered best practice or it could be considered farm biosecurity.  Either way it makes good economic sense. 

The more formal definition of farm biosecurity is “management practices and activities that are carried out on your property to prevent the entry and spread of pests”. 

Ultimately, farm biosecurity is about protecting your livelihood, your industry and that of your neighbours.  Farm biosecurity is your responsibility, and that of every person working on or visiting your property. 

The nature of the greenhouse environment means tomato growers face unique challenges when it comes to managing pests.  There is no natural weathering to remove debris from previous crops and crops are grown relatively intensively which can increase the risk of pest incidence as well as the likelihood of spread.  What this means is tomato growers undertake farm biosecurity as a matter of course due to the environment they are operating in.

When signing up to GIA, TomatoesNZ committed to raising awareness of biosecurity and how it can be monitored and managed amongst tomato growers.  Farm biosecurity is a practical way for all growers to demonstrate awareness of and commitment to managing biosecurity issues.

Although important, farm biosecurity does not need to be onerous.  To follow are some areas to consider in the context of farm biosecurity.  It may be that you already have it covered – if so, give yourself a pat on the back.  If not, consider how you can implement some of the following concepts into your day to day operations. 

Be aware of biosecurity threats

Virtually every grower in New Zealand could name fruit fly as a biosecurity threat but do you know the other pests or diseases of greatest threat to the tomato industry?  On behalf of TomatoesNZ, Market Access Solutionz has developed fact sheets for some of the pests that are the most likely to enter New Zealand and/or would have the most significant economic impact on tomato growers.  These fact sheets can be found on the Exotic Pests – Fact Sheets page.

Ensure relevant staff are familiar with pests you usually associate with your crop and property and those that they should be on the look-out for.  Display posters of pests normally associated with your crop and posters of exotic pests to look for.     

Use quality seedlings

Any plant material moved onto your property can be a potential source of pests.  Monitor any planting material that comes onto your property.  Ensure you are sourcing high quality seedlings from a trusted source and inspect prior to planting for any signs of pests.  Keeping records of plantings (and other inputs) enables you to trace back and trace forward if necessary (i.e. where has it come from, where did it get planted).

Keep it clean

Workers and Visitors

Workers, visitors, equipment can spread pests onto and around your property.  Make sure workers on your property are aware of hygiene practices for themselves, equipment and vehicles.  This can easily be included as part of staff induction.  Signage can be put up to ensure visitors are aware of any specific hygiene or biosecurity requirements you may have.

Remove of Waste and Dry Cleaning

Removing old, unhealthy or unwanted plant material is essential as it can be a major source of pest contamination.  Consider how this is disposed of – do not leave sitting near the greenhouse.  Also, remove any other associated equipment such as trays, pots and strings.  The effectiveness of disinfectants and sanitisers may be reduced if there are high levels of soil so dry-cleaning dust and soil is advised.  

Pre-Cleaning and Sanitising

Once dry-cleaning and most contaminants have been removed, high levels of infective material may still remain.  Cleaning using detergents/sanitisers will reduce the spread of disease in wash water and may reduce the time required to clean by up to 60%. 

Water System and Equipment Sanitising

All irrigation systems may contain some form of contamination.  Flushing irrigation lines after any treatment will minimise the likelihood of contamination.  Ensure all equipment that is moved from greenhouse to greenhouse is cleaned and sanitised appropriately as this can be a major source for transfer of contamination.

Disinfection

Even after cleaning and sanitising, the level of disease present could be sufficient for it to re-establish.  Ensuring all surfaces are thoroughly wet with disinfectant is the most likely way to break the cycle of infection.

Fogging and Aerial Disinfection

To disinfect any areas that may be inaccessible or have been overlooked, consider fogging the greenhouse and any storage areas.  Regular fogging during the growth phase of the crop may also be beneficial.

General Hygiene

There are a number of other ways to minimise/manage transfer of contamination around your property and the wider region. 

  1. Sanitise pruning knives
  2. Foot dips / disinfectant soaked mats placed in appropriate locations around your property and are regularly changed
  3. Hand hygiene – visitors as well as workers should be required to wash their hands
  4. Wheel dips for equipment
  5. Disinfection of paths and areas around the greenhouseClean clothing and no smoking

Check your crop

Know what’s normal and monitor your crops, the frequency will be dependent on growth stage, weather conditions, and presence of pests.  Increase the level of monitoring if you have any concerns.  This can be as simple as a walk through the greenhouse or part of a more formal crop monitoring programme.  Knowing how your crop usually appears, and what the signs and symptoms of your usual pests look like will enable you to notice anything unusual.  Take photos or keep records of anything unusual if you think you need to.  Early detection of a new pest may can greatly increase the chances of eradication before it establishes.

Follow instructions when applying agrichemicals, the misuse of agrichemicals can lead to resistance development which can lead to ongoing biosecurity problems.  If you suspect pesticide resistance, get additional advice from an agronomist or chemical supplier.

Work with sick or suspect areas last as this will minimise the risk of spreading pests if present. Destroy unhealthy plant material by burying or burning to ensure infected plant material does not spread pests.

Abide by the law

Support and be aware of laws and regulations established to protect the tomato industry and other horticultural industries in your region.

Report anything unusual

If you see any unusual pests or plant symptoms report it immediately to the MPI Exotic Pest and Disease Hotline 0800 80 99 66.

The “Resources and fact sheets” page has resources for tomato growers including the Tomato Grower Biosecurity Plan and Checklist 2017. The last pages of that document include a Biosecurity Best Practice Checklist – exploring the concepts above in more detail.  Completing the checklist will give you the opportunity to see what you are already doing and what you might want to consider including in your growing operation in future. 


To view these documents on the TomatoesNZ website click on the links below 

https://www.tomatoesnz.co.nz/industry/biosecurity/what-is-farm-biosecuritynew-blog-post/

https://www.tomatoesnz.co.nz/industry/biosecurity/resources-and-fact-sheets/


I appreciate your comments.  Please feel free to comment below or on the grower2grower Facebook page:

https://www.facebook.com/StefanGrower2grower/

Article  content supplied by Helen Barnes, General Manager, TomaotesNZ


Categories
Irrigation/Substrates Technical

Nutrition

Revisited For Early Summer 2018-19


In addition to the recent articles on irrigation, I feel it is important to emphasise the role of fertilizer.  Nutrition is an important aspect of growing.  Using the correct fertilizer recipe is important to make sure you are maximising the plant’s production.

Raw water analysis is different from property to property. Before a fertilizer recipe is created your nutritional advisor should have a copy of your water analysis, whether it is bore water or pond. If you have both do a separate analysis for each.   If you blend both bore and pond water, estimate the percentage you use of each.

Once you have a recipe for your property talk to your local fertilizer supplier about the different brands available.  So what should you look for when making your choice?  If you purchase fertilizer based on a price per bag you will need to check the product formulation and nutrient analysis. If I take Calcium Nitrate as an example; some tetra hydrate formulations contain 16.5-16.9% Ca while di hydrate formulations can be as high 19% Ca, this means that the difference is approximately 1.8 Ca which equates to greater than 10% difference. These variances will affect the amount of fertilizer you need to add to your tank. Remember it’s all about the nutrient content in your solution, not the amount of fertilizer you add.

The high water content in tetra hydrates is not as hard bound as the di hydrates. Therefore, the physical properties may not be as good, which can lead to a higher tendency to cake or melt under high temperatures.


Recycling:

When recycling, what percentage of recycled runoff water do you blend with fresh water and fresh fertilizer?   Whatever the percentage, this will require you to conduct additional water analysis of what you are irrigating the plants with and what is coming out of the bags and into your runoff holding tanks.  There will be a higher EC value in your runoff but what exact percentage of fertilizer elements are left in that runoff are unknown.  The water analysis will then give your nutritional expert the best chance to get your fertiliser recipe’s accurate in relation with what your plants nutritional requirement is.


Please consult with your local nutritional expert to ensure you are using the correct recipes to maximise plant health and production.


I appreciate your comments.  Please feel free to comment below or on the grower2grower Facebook page:

https://www.facebook.com/StefanGrower2grower/

Article supplied by Stefan Vogrincic, Consultant, Grower2Grower

Categories
Consumables/Hygiene

Compostable – Bio-degradable Twine

Trial in South Auckland

Earlier this year I came across a company promoting compostable and bio-degradable twine.  It is certainly something that I have always been interested in.    Synthetic twine has always caused problems for growers, especially when disposing of old crops. However, there has not really been a satisfactory alternative.

12 years ago, whilst in the UK, was the first time I saw and used bio-degradable twine.  It seemed to work well without too many issues.  It was being used by an organic grower who wanted all of the plant material and string to be composted.  The calculated extra expense of removing synthetic twine, when removing old crops, verse purchasing bio-degradable, made it financially viable for that company to purchase bio-degradable twine.   It has a very different feel compared to synthetic twine.

I am not 100% sure why growers in NZ have not trailed bio-degradable twine in large quantities before (myself included) but I think the cost has certainly been a consideration.  Another reason could be that our UV rays are too strong and break down the product too quickly.   I have been told that this new product has UV protection.


THE PRODUCT:

The product being trialled is a blend of natural fibres including plant and Visose fibres (Viscose rayon is a fiber of regenerated cellulose; it is structurally similar to cotton but may be produced from a variety of plants such as soy, bamboo, and sugar cane.).   It is 100% compostable and bio-degradable.  Two strengths of twine are being used, the first 250N rated for 25 kg and 400N rated for 40kg.

The twine is rated as low elongation and has a UV protection.  It is available in 4 colours, either on three sizes of tomato hooks, 14cm 18cm and 22cm.  It is also available on 5kg spools, ranging from 5500 meters per spool for the 250N or 3590 meters per spool for the 400N.

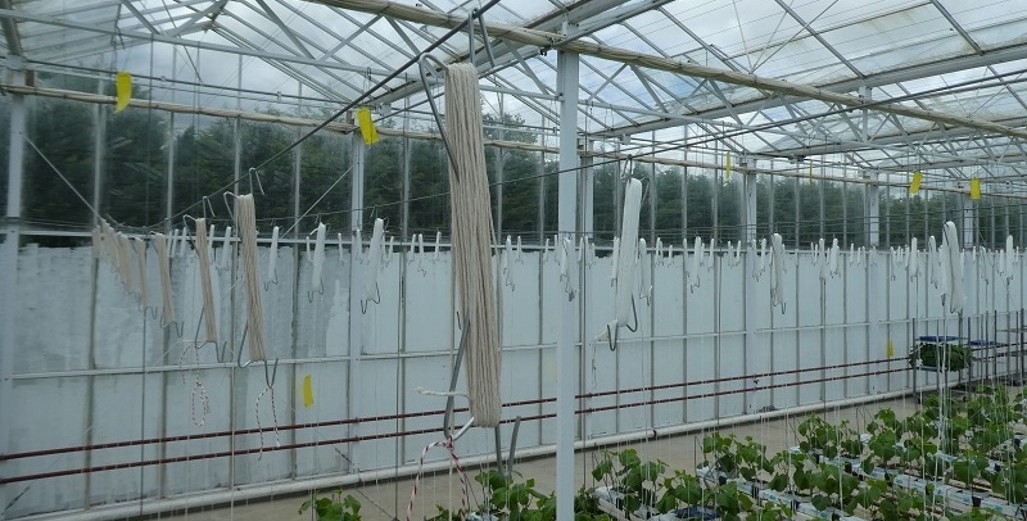
Including trailing this biodegradable twine in our harsh climate, there will also be a trial of the new tomsystem. (TomSystem is an innovative plant staking system for greenhouse crops – it ties the plants onto the twine using galvanised metallic staples.)  And another advantage is the V46 clip used in the TomSystem is biodegradable.


CONCLUSION:

If there is a saving to be had disposing the product in a green-fill waste landfill (where possibly methane can be extracted as a by-product) it certainly makes sense to be investigating these options.  The TomSystem is more about the grower increasing productivity. However, if it does appear to be a win-win situation- helps the environment and potentially increase profitability, it is certainly worth trying.


Tomsystem


I appreciate your comments.  Please feel free to comment below or on the grower2grower Facebook page:

https://www.facebook.com/StefanGrower2grower/

Article supplied by Stefan Vogrincic, Consultant, Grower2Grower


Categories
Irrigation/Substrates Technical

Target Figures

Target Figures


I was asked a question regarding the article I posted ‘What time should I start and stop my irrigation?’ The question was “What about the amount/doses of water, do they vary by morning to afternoon or are they the same?”

This is a very important question.  My thoughts below:

Example: If target EC and WC figures have been achieved by mid to late morning and 30-40% drain has been realised.  By early afternoon, your substrate should be at the maximum WC target level and EC at the low end of you target.  From this period onwards, if you monitor runoff levels and find that it is increasing unnecessarily, you have options.  Either increase the solar trigger between irrigations or reduce shot size.  If you reduce volume per cycle, make sure the irrigation is as accurate as possible (minimal standard deviation between drippers).


Several environmental greenhouse computer systems only have the ability for you to change volume/per cycle manually, the same applies with the solar trigger.  Some growers, with more technical environmental computer systems, are able to set different times/periods where the computer will automatically change the solar trigger and volume of water per cycle applied.  There are some great real time data collection systems which allow growers to see when and how much drainage percentage they have after every irrigation, as well as constant, real time WC and EC data.  This data/information is the basis for an irrigation strategy.  If and when you start achieving high and unnecessary drain, (probably in the afternoon period) the grower interprets the data and will alter their irrigation strategy.  Variety, age of crop, time of year and target figures will have a bearing on each grower’s plan.  


My goal is to reduce or even eliminate unnecessary irrigations.  An important consideration is the cost of an irrigation including, water, fertilizer, electricity and excessive/unnecessary wear and tear on irrigation equipment.   The potential harm to the plants root systems, by continually overwatering, is a major growing consideration.  In my first two season as a grower, I grew in pumice and then I was persuaded to change to stone-wool.  For the first year or so I totally overwatered in the stone-wool substrate.  It took me time to adjust and trust my advisor when he told me I was hurting my plants with kindness.  I did realise that by over irrigating I was causing more harm than good.   Growers have different opinions on substrates, which is absolutely fine, but what is probably universal is that each substrate and volume of substrate you use will have a set of target figures of WC and EC you will need to have to get the best out of your product. 


I appreciate your comments.  Please feel free to comment below or on the grower2grower Facebook page:

https://www.facebook.com/StefanGrower2grower/

Article Written by Stefan Vogrincic, Consultant, Grower2Grower


What time should I start and stop my Irrigation

My favourite subject!


“What time should I start and stop my irrigation?”   This is the question I am asked more than any other, especially as we approach summer.   Leading into late spring water usage, by the plant, is increasing so irrigation needs to follow suit.  For each individual crop, determined by crop age/fruit load and substrate you are using, I would advise you use WC and EC target figures.  Different substrate will have a bearing on advised target figures. 


STOP TIME:

The time you chose to stop irrigation in the afternoon will be very dependent on your substrate.   Overnight, various substrates will all dry-down differently.  Certain substrates are hydrophobic and some are not. Like clothes when they dry, the substrate will naturally release moisture.  How much of a substrate is not covered in plastic will effect dry-down.


START TIME:

Generally, I would start irrigation one hour after sunrise.  Outside weather conditions should be considered.  In the past I have been advised to irrigate very differently.  One consultant advised to begin at sunrise, to immediately start refreshing the substrate replacing what had been lost throughout the night.   One reason for this technique is to reduce the delta EC.  The theory, why stress your plant when you don’t have to and why make the job managing the rootzone harder.

It was explained by another person that if you irrigate too soon after sunrise you will damage root hairs.  I have also heard you should not start before you have 10% dry-down, because only then you are aware the plant is fully active!!

What I can tell you is how I would irrigate my plants.  This time of the year, I would have a fixed time start, one hour after sunrise.   During January this could be sunrise depending on variables. 


TARGET FIGURES:

Target water content (WC) and EC guidelines will change between crop stages and seasons.  If you don’t have a sensor to measure WC in the slab, then using weigh scales is an option.  If you have neither then use EC tested from runoff as your guide.  Daily checks are advised.

For years I worked on the basis I needed to achieve 30% runoff on average, each day.  Though there is still merit in that, I prefer to use WC and EC targets to manage a crop.  Crop reports are integral for advising on target figures. 

Growers all have slightly different growing setups.   I don’t know any growers who plant on the same day, with the same variety or use the same substrates.  For that matter the same volume per plant of substrate. 


In Conclusion (tomato):

I would prefer you started earlier and stopped earlier, and possibly use a 'night shot' if your substrate is drying down more than 10% over night.  For more specific advice on this subject please contact me.

Categories
Industry Profile

CSM, Forestburg Eggplants

Simply Stunning


The Business:

Kees van der Eijk and Svend Pedersen are business partners who co-own CSM Limited, established in January 2001.  CSM limited are the largest eggplant growers, by area and volume, in New Zealand.  Together they have built an amazing high-tech greenhouse facility with some brilliant ingenuity.   Since converting from capsicum production to eggplant production in 2005, Kees and Svend have together transformed the NZ eggplant market.

In 2000 Kees, his brother Marinus and Svend purchased a property in Warkworth, on which they were intending to build a greenhouse to produce capsicums.  The long, drawn-out process of gaining Resource Consent meant by the time it came through it was too close to winter to start building.  At that opportune time, a property in Dairy Flat, with a 4000m2 modern greenhouse structure, came up for sale.  The decision was made to not wait any longer, to purchase the Dairy Flat site where they could start producing capsicums immediately.  One year later the property in Warkworth was sold and the first new glasshouse extension of 5500 m2 was added to the Dairy Flat Site.  For the next 4 seasons, until 2005, capsicums were grown until a virus, in the capsicums, meant the crop would be cut short.  Kees needed a short crop to grow until the start of the next capsicum season.  Kees wasn’t certain what they would grow, he was not keen on cucumbers or tomatoes so he simply went for a drive to the local supermarket to see what other products could be grown.  The vegetable that caught his eye was eggplants.  With a few phone calls, to advisors in Holland and a local seed company, the decision was made – eggplants replaced the crop of capsicums.  The eggplant crop was so successful the decision was made to completely change from growing capsicums to specialising in eggplants production thereafter. 

An adult crop of Eggplants in the most recently built glasshouse, installed with diffused glass.

Staff are busy dropping strings to tie up the plants that arrived two days earlier from the nursery.


When CSM first began growing eggplants the local market preferred 500 grams to 700-gram fruit.  Kees very quickly learnt, from growing his first crop of eggplants and from advice from Holland, that eggplants should be harvested when they are 300-400 grams.  The two major reasons are that the bigger the fruit becomes, the less goodness and flavour it has (it becomes too old) and it is extremely counterproductive, for plant balance, to leave huge fruit on your plant for too long.   Very quickly CSM changed the market to accept smaller, higher quality product which you see in the supermarket today.  If you like eggplants there is a very good chance you have consumed product produced by CSM.

In 2006 a further 10,000 m2 glasshouse was built, taking the total greenhouse area to just under 2 hectares.  As CSM had doubled the size of their production it was slightly unknown how the market would react to such an increase in what was possibly perceived as a niche product.  As time passed, the popularity and demand of eggplants grew, so further expansion of a stand alone 12,000 m2 glasshouse was built, in 2013, on the same site. By this time Marinus had left the business to follow his passion of consulting to Capsicum growers.  The new glasshouse was no ordinary greenhouse and was, to my knowledge, the first seven-metre-high glasshouse built using diffused glass technology here in New Zealand.  The installation of diffused glass has been a real learning curve and as a result of the new glass, the eggplant crops became very generative in summer, aging the crops very quickly. This led to a screen being added, the following season, to protect the crops in higher light level periods.   Kees uses a Dutch advisor, who has supplied great guidance, but Kees is certain that New Zealand conditions are totally different and harsher compared to Holland and that advice has to be tailored for NZ specifically.  He gave an example of a variety grown in Holland that he was advised to grow.  It was producing fantastic quality, size and yields in Holland but when Kees trialled it here in New Zealand it was very difficult to achieve the same fruit size, no matter what he tried it just would not perform.  The growing techniques were the same, Kees believes our harsh climate was not suited to that variety.  Finding varieties suited for different planting dates is also challenging. 

After resolving the teething problems, with the new glasshouse and with the market expanding, another 12,000 m2 equally high-tech modern glasshouse is currently being built which will take the size of the property, under glass, to a very impressive 43,500 m2 comprising of 5 growing compartments.  Fourteen full time staff are currently employed by CSM and this will increase with the new extension.

A new packing shed is currently under construction

Svend and Kees work extremely hard and it is very apparent to see they work very well together as a team, contributing to the success of their business.   Both have specific roles, Kees is in charge of the growing and Svend looks after the packhouse and the books.  However, Svend is also a grower and when Kees is on holiday is more than capable of running the growing operation and vice versa.   They are the perfect team.  Next year when I will be writing several articles on the different types of heating systems that are used in NZ, in one of these articles I will be covering the system that is supplying CSM with warm water and CO2, and how they have gone from burning coal to using landfill gas piped from the local landfill and Co- generation to produce Co2 and heat for the glasshouses.


The Grower:


Kees van der Eijk, is the head grower of CSM in Dairy Flat, just north of Auckland.  Kees was born in Zevenhuizen, a village in South Holland. It is located about 12 km northeast of the city of Rotterdam.  Like many greenhouse growers he was born into the greenhouse industry.  His family owned a 2ha nursery growing roses in Holland. It was no surprise that as part of his further education he completed a Bachelor of Horticulture. 

During the 1990’s Kees’ brother had embarked on a journey to New Zealand, where he worked for a capsicum grower. Kees was also interested and decided to come to New Zealand, where he gained a six-month contract to work on a new greenhouse building site.  Kees returned to Holland for six months, but in 1998 he decided to return to New Zealand.  On his return he was offered a full-time role with the same company for growing capsicums.   After 18 months his ambition, to own his own business, was very strong and this was when the partnership with his brother and Svend was formed.


The Growing:

Kees and Svend have learnt, and been willing, to change their philosophy on growing eggplants in New Zealand conditions.  In the early years, the crops were layered and were grown for 12-month rotations.  What they observed was the last two months of the yearly cycle were always a struggle to keep the plant strong. This was also the time that insects would adversely effect crops.  When the new 12000 m2, seven-metre-high glasshouse was built in 2013, diffused glass was used   Instead of creating a more vegetative environment, which was hoped, the eggplants struggled with the extra light, and aged faster.   Soon after, a screen was installed to reduce the pressure on the plants.  They were then convinced that growing in 12-month cycles was not 100% suitable for New Zealand conditions, unlike that in Holland.  Based on their experience, crops are now grown in 10-month cycles.  Another advantage, to growing a 10-month crop, is that there is no more need to layer the plants, which eggplants are not naturally suited for anyway. 

Kees and Svend are owners of one of the most technological advanced greenhouse properties in New Zealand.  The experience, growing different crops prior to growing eggplants, has given them an invaluable head start.  The ability to adapt growing styles and approach has been a pleasure to watch over the years, it is testament to the immensely talented grower he is. 

These eggplants are grown in the glasshouse built in 2013 using diffused glass.  A screen was added soon after.

These plants arrived two days earlier from Gellert Nurseries.  The plants are V out one or two days after planting, or for the novice you can see they are leaning out towards the path, every second plant is leaning out to the opposite side creating the V.  CSM use Stone-wool as their growing media.  The water content and EC are continuously monitored in the slabs to give the root systems the optimal chance to thrive.

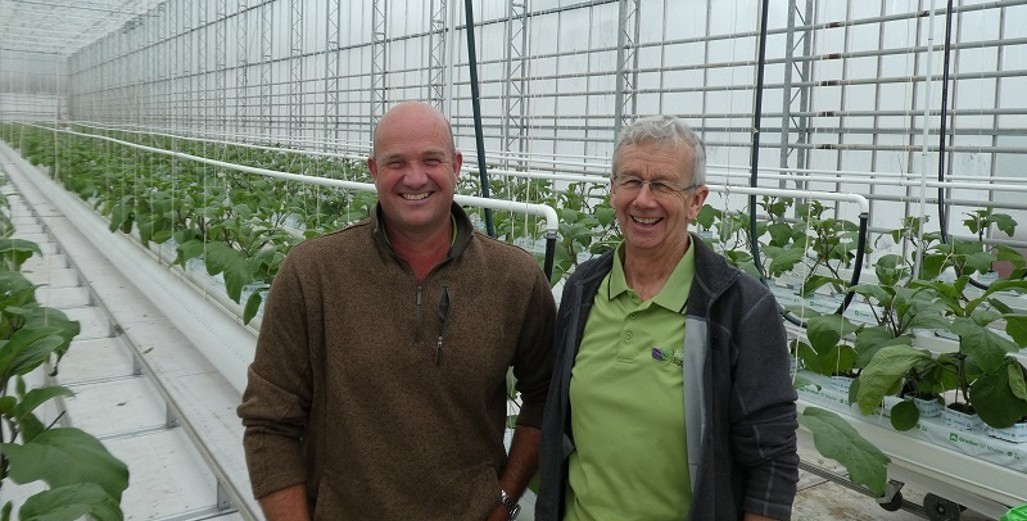
Cover photo of Kees van der Eijk (left) and Svend Pedersen (right)


I appreciate your comments.  Please feel free to comment below or on the grower2grower Facebook page:

https://www.facebook.com/StefanGrower2grower/

Article Written by Stefan Vogrincic, Consultant, Grower2Grower

Categories
Industry Profile Supporting Services

Antoni de Bruin, grower and consultant

Grodan's GroSens and e-Gro support capsicum grower with consultancy practice

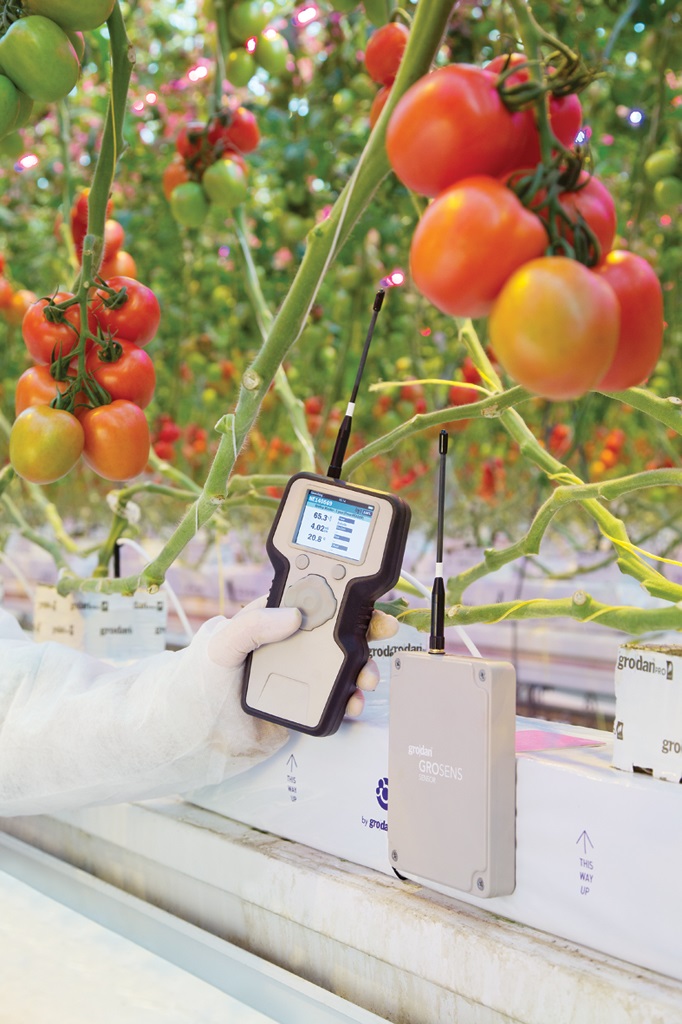
Dutch Grower Antoni de Bruin from Klazienaveen makes remarkable choices. For example, he combines the cultivation of six hectares of green capsicums (partly lighted) at two locations with a consultancy practice. Also special is his preference for the Grodan GT Master substrate slab. Thanks to the GroSens Multisensor system and the handy e-Gro app, he can follow his cultivations anytime and anywhere and make adjustments if so required.


Remote cultivation:

As an opinionated entrepreneur, Antoni de Bruin does not hesitate to deviate from the beaten track. It has given him a lot of knowledge and experience, which also benefits his colleagues. On a part-time basis, he advises a number of fruit vegetable growers in the border region, with the emphasis on irrigation and fertilization.

“The combination of cultivation and advising is fun and keeps me on my toes”, he explains. “And thanks to the advancing technology and the internet, I do not necessarily have to be present at the company to keep an eye on the cultivation factors. Nowadays you can log on with the computer remotely and change settings if necessary.”


Lighted cultivation:

Last year the grower doubled his acreage of green peppers to six hectares by adding a nearby former rose business to this company. The cultivation system is partly geared to this: eight gutters (4×2) per 8 m roof span compared to six gutters (V-system) per 8 m roof width on his first company. Thanks to the already installed and largely depreciated lighting installation, he can bring forward and increase production here for limited additional costs. “I start the lighted cultivation slightly earlier than the unlighted cultivation, but I do this with smaller plants. Thanks to the growth light, they root faster and there is a larger root package in the slab before the setting. The plants also have just a bit more strength. The first two harvests produce 4 kg more and I am earlier in the market than most other sweet pepper growers.”


Plant data:

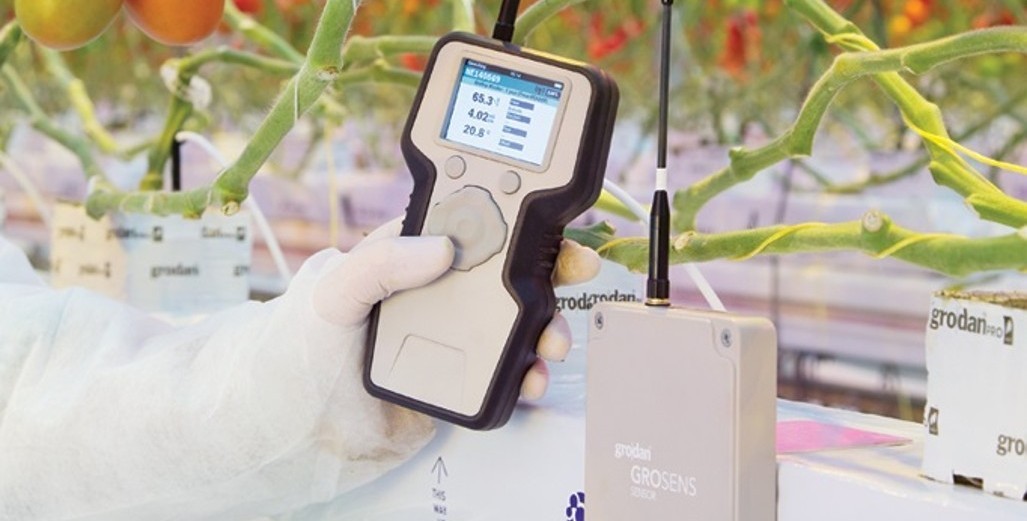
The man from Drenthe in Holland, has been working with the GroSens Multisensor system for 3 years and has had good experiences with it. “I have three sections with different plant data and use three sensors in each section. Additionally, I also have a GroSens HandHeld meter, which I mainly use for sampling in places where it is sometimes slightly wetter or drier than average. Combined with the drainage measuring I can follow in detail the course of water content (WC) and EC in the slabs. To keep a pepper crop well in balance and to maximize the performance, you have to make optimum use of the possibilities. That is now easier and better than before. The e-Gro app has made it even easier. As long as you have an internet connection, you can follow everything perfectly.”


High slab better controllable:

Also three years ago – perhaps inspired by his frequent contact with tomato growers – De Bruin switched over from the GT Expert to the GT Master Dry stone wool slab. A year later he took the step to the GT Master 10 cm high, which he still likes very much. “I believe that a high, better controllable slab offers added value, also for peppers,” explains Antoni. “The recent launch of the Grodan Supreme pepper slab confirms this too. I found the Dry just a little too dry in the second half of the cultivation. This is my second year with the GT Master and I really like it.” Thanks to the wide control range and the speedy re-saturation I can manage the root environment well and keep the crop nicely in balance.”


Irrigation strategy:

The grower from Klazienaveen follows a strict irrigation regime. After the slab has been reduced by 9-11%, in the evening and night, he fills the WC in three large turns of 4% each time and lets the slab drain at noon. “After these regular sessions I give water based on WC and light level”, he continues. “The stopping time is between 2:30 and 5:30 in the afternoon. For me this depends on the expected time period required for the slab to reduce by 9 to 11% again, until the next morning at 10 a.m. It is mainly thanks to GroSens that I can now even better align the starting and stopping times to the need of the crop. In the long run it keeps the plants more vital, better in balance and therefore more productive.”


Thanks to GroSens and e-Gro De Bruin always has an overview of the root environment and he can combine the pepper cultivation well with his consultancy practice.

Antoni de Bruin: “It is mainly thanks to GroSens that I can now better align the starting and stopping times that the crop needs.”


If you are interested in Grodan's Grosens technology please contact:

Sonny Moerenhout

GRODAN | ROCKWOOL B.V. | M +31 6 12 14 69 95 | sonny.moerenhout@grodan.com | www.grodan.com


Categories
Greenhouse News Technical

Cucumber Leaf Phytotoxic Reaction.

Accidentally damaged not through neglect but kindness


It is timely that I write this article the week Educhem opened their new premises in Tuakau.  Whether it is a coincidence or just good timing, this is a perfect example of why there is a need to make sure every grower has the best possible knowledge and information to prevent potential accidents from occurring.

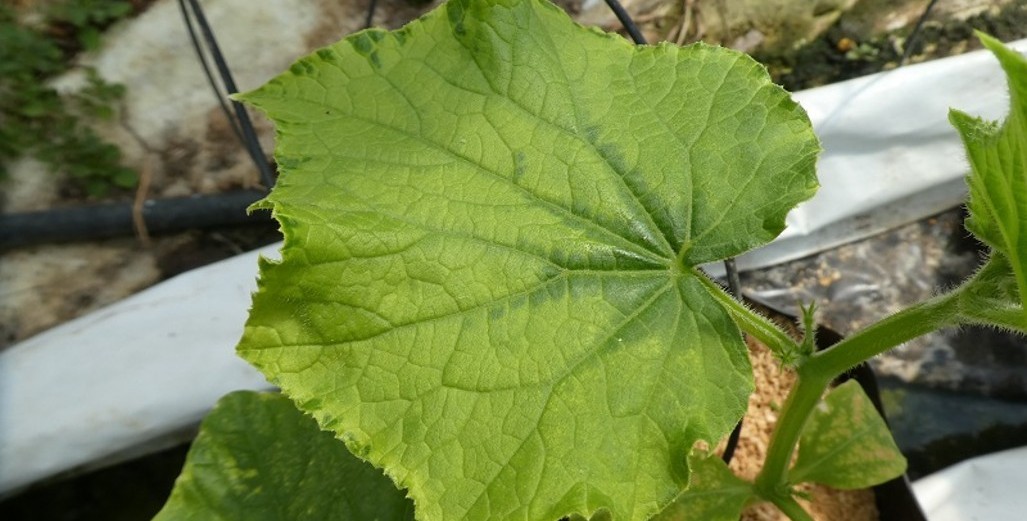
In the cover photo, I think it is probable that there has been a phytotoxic reaction to the cucumber leaf.  After a bit of probing, I realised this may have been caused by residue from a disinfectant.  It is possible it had remained active/present in the irrigation lines between plantings.  The level of concentration (luckily), from the disinfectant in the irrigation lines, must have been at the low end of the scale, but you can see it has affected the appearance of the leaf, turning almost 80-90% of the leaf a light yellow/lime colour.  The very top of the plant was ok and I expect the plant to grow through this hiccup.  It is hard to put a financial value on how much this will cost the grower.  It will certainly take, depending on the severity, time to recover and therefore a delay to the start of harvesting.  It is more than probable this will have had an adverse effect on the root systems reducing their growth rate.

The benefit of my experience and visiting hundreds of growers, in New Zealand and globally, is that I have seen many crops accidentally damaged not through neglect but kindness.  I have seen crops damaged by products used to disinfect irrigation lines before.  A problem may occur if you don’t flush out the irrigation lines sufficiently before you replant and residue from the chemical has remained.  If you are not changing your substrate and wish to disinfect irrigation lines, please, first remove the drippers from the substrate.

Cucumbers are very sensitive to the slightest issue. Tomatoes and peppers are more forgiving but not exempt, if the product is toxic to the plant then you will damage the plant, affecting its ability to function normally.  Here is the conundrum, either do nothing or do something, especially if you know you have a problem with your water supply.  I think growers should be encouraged to use products that keep their irrigation systems clean and their plants healthy, but the advice given to them when purchasing these products is the most important piece of the puzzle.  Water sources are generally never 100% free from contamination, otherwise we would not have the need for such products on the market. 

By completing appropriate training, you will equip yourself with the questions to ask your supplier, when purchasing chemicals, to limit the chance of plant damage.  It won’t make growers immune to problems, but I would certainly hope it will prevent severe crop damage.   Always consider the time of the year, the age of the crop, and how the weather will influence toxic reactions.

It is not just cucumbers, tomatoes, peppers and eggplants that are affected but all plants grown in greenhouses.  Flower growers have to be especially vigilant, if the flower is damaged then their product is not marketable. 

Below is an article I came across on the internet from Kristin Getter, Michigan State University.  If you have time it is worth reading.

 http://www.canr.msu.edu/news/plant_phytotoxicity_in_the_greenhouse


I appreciate your comments.  Please feel free to comment below or on the grower2grower Facebook page:

https://www.facebook.com/StefanGrower2grower/

Article Written by Stefan Vogrincic, Consultant, Grower2Grower

Categories
Technical

Spring weather has been kind (until last week)

I tempted the weather gods!


Two weeks ago, I wrote about the great spring weather we’ve had and how I’d noticed the increased fruit load, normally seen further into the late spring/early summer, and that you may need to consider making slight adjustments if the weather turns!!  So, I do apologise to all of the greenhouse growers out there for tempting fate!  Because rain it has!! I was talking to a dairy farmer from Morrinsville, last week, and he said to me if they did not get any rain in the next two weeks, it was looking like a long summer.  I believe greenhouse growers, with water storage ponds filled from rain water, will also be sighing with relief. 

With the rain has come the ever so slightly late equinox winds.  I always prefer the rain to, rain combined with strong winds.  Today (1st of November) is a perfect example of why strong winds and intermittent rain showers are a pain.  The clouds move quickly, and because of this the light levels rapidly change – over 300 joules per/hour one minute then back to 50 joules per/hour, and then back to 300 joules per/hour about a million times in a day (exaggerated of course but multiple times)!!  At this time of year, the sun will quickly heat up the greenhouse.  The high wind and rain will cause venting capacity to be restricted.  Not only will the greenhouse temperature increase quickly but so will humidity.   Once the rain stops, it takes time for the rain sensor to dry and for the vents to open again.  Once the vent does open and the temperature and RH reduce to a normal level, a cloud appears and it starts raining again!   

I remember feeling like a cat chasing its tail during this weather.  But over the years I’ve learnt that dropping the day time minimum pipe temperature is not the best approach.  My intentions were to keep the plants and environment dry, not necessarily use the pipe to keep the environment warm.  What minimum pipe temperature you choose to have will be dependent on the outside temperature.    

If I did not use a minimum pipe, and possibly more important maximum pipe setpoints, the temperature would fluctuate, which is annoying, but more of a concern is the large swings’ in Relative Humidity.  Reducing fluctuations during this weather, I would prefer to keep a minimum pipe of at least 35 degrees and a maximum of 40 degrees.  It is easier said than done, but I advise your lee-side vent does not close below 15%.  On this particular day the outside temperature was 14 degrees.  You need a plan and that would be my strategy.

It is still not perfect, the weather will dictate, but if you use a tight minimum and maximum pipe setpoint, you might be happily surprised to find that the fluctuation in temperature is not that bad and there is less fluctuation in RH, and that is important.  

Irrigation is very difficult during this weather.  The irrigation automatically starts irrespective if there is sun or rain.   If it is raining, you will have a large amount of runoff due to reduced uptake, then the cloud disappears and the sun shines again!!   

Growing in New Zealand is a challenge but life would be boring without these challenges.


The blue line is humidity. The green line is greenhouse temperature.  The red line the light level.  You can see why growing on a day like this has its challengers.  The start of the next day, the 2nd of November, illustrates how much easier it is when the weather is good.  Image taken in the South Auckland area.


I appreciate your comments.  Please feel free to comment below or on the grower2grower Facebook page:

https://www.facebook.com/StefanGrower2grower/

Article Written by Stefan Vogrincic, Consultant, Grower2Grower


Image from my balcony at 1pm on November 1st. 


Categories
Irrigation/Substrates Technical

What time should I start and stop Irrigation?

My favourite subject!


“What time should I start and stop my irrigation?”   This is the question I am asked more than any other, especially as we approach summer.   Leading into late spring water usage, by the plant, is increasing so irrigation needs to follow suit.  For each individual crop, determined by crop age/fruit load and substrate you are using, I would advise you use WC and EC target figures.  Different substrate will have a bearing on advised target figures. 


STOP TIME:

The time you chose to stop irrigation in the afternoon will be very dependent on your substrate.   Overnight, various substrates will all dry-down differently.  Certain substrates are hydrophobic and some are not. Like clothes when they dry, the substrate will naturally release moisture.  How much of a substrate is not covered in plastic will effect dry-down.


START TIME:

Generally, I would start irrigation one hour after sunrise.  Outside weather conditions should be considered.  In the past I have been advised to irrigate very differently.  One consultant advised to begin at sunrise, to immediately start refreshing the substrate replacing what had been lost throughout the night.   One reason for this technique is to reduce the delta EC.  The theory, why stress your plant when you don’t have to and why make the job managing the rootzone harder.

It was explained by another person that if you irrigate too soon after sunrise you will damage root hairs.  I have also heard you should not start before you have 10% dry-down, because only then you are aware the plant is fully active!!

What I can tell you is how I would irrigate my plants.  This time of the year, I would have a fixed time start, one hour after sunrise.   During January this could be sunrise depending on variables. 


TARGET FIGURES:

Target water content (WC) and EC guidelines will change between crop stages and seasons.  If you don’t have a sensor to measure WC in the slab, then using weigh scales is an option.  If you have neither then use EC tested from runoff as your guide.  Daily checks are advised.

For years I worked on the basis I needed to achieve 30% runoff on average, each day.  Though there is still merit in that, I prefer to use WC and EC targets to manage a crop.  Crop reports are integral for advising on target figures. 

Growers all have slightly different growing setups.   I don’t know any growers who plant on the same day, with the same variety or use the same substrates.  For that matter the same volume per plant of substrate. 


In Conclusion (tomato):

I would prefer you started earlier and stopped earlier, and possibly use a 'night shot' if your substrate is drying down more than 10% over night.  For more specific advice on this subject please contact me.


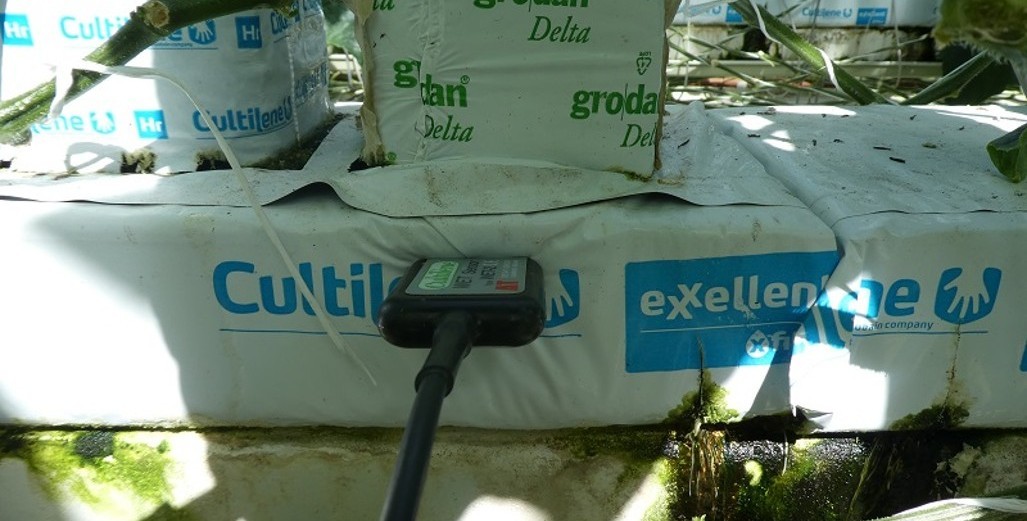
Water Content and EC meters give accurate data from stone-wool slabs.  Having this information, the grower can use target figures to make sure he is meeting his objectives. 


Positioning of the probe: Data should be recorded from the top and bottom third of the slab.  You should also check WC and EC accross the slab to check for dry spots/high ec.  This to be covered in a future article. 


I appreciate your comments.  Please feel free to comment below or on the grower2grower Facebook page:

https://www.facebook.com/StefanGrower2grower/

Article Written by Stefan Vogrincic, Consultant, Grower2Grower

Categories
Greenhouse News

Murray and Penny Beare, Grand opening of Tuakau Offices

For Educhem, AquaSan & AgHort Services.


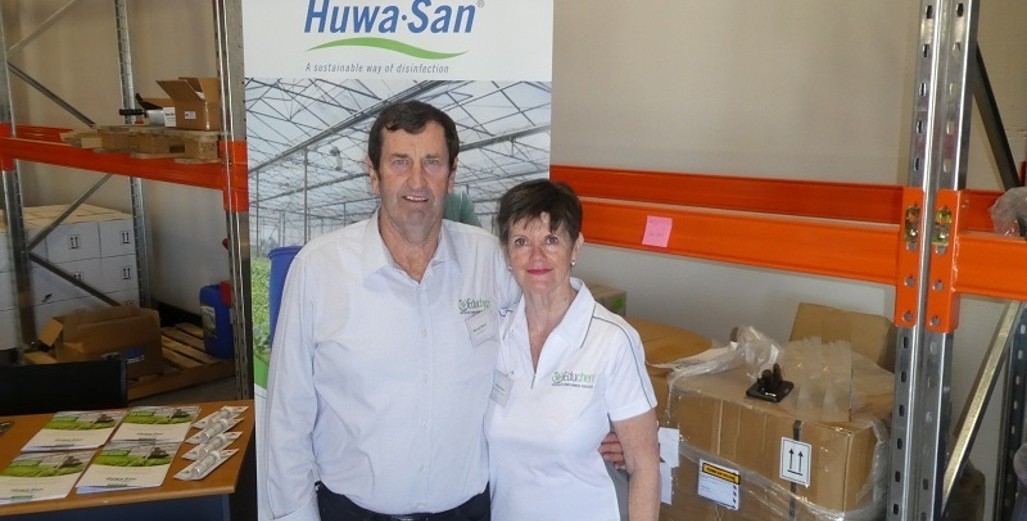
Murray and Penny Beare, have recently moved their business to a new purpose-built facility in Tuakau for Educhem, AquaSan International and AgHort Services NZ.  The offices were officially opened by Andrew Baker, local councillor, on Friday the 2nd of November. 

Murray and Penny have been working tirelessly, as they re-located to their new offices.  Along with all their staff they are now located at 36 Bollard Road, Tuakau.  The upstairs offices is where all the day to day running of the business will take place, training courses will be held downstairs in the theory and practical training rooms.  

Murray provides Agrichemical training, throughout NZ, for growers to gain their Growsafe and Approved Handlers certificates amongst other services.   Murray conducted the first Growsafe course nearly 30 years ago which many greenhouse growers attended. 

Over the last two decades regulations have constantly changed, Murray has always made sure growers are kept up to date with compliance regulations.  New regulations, which came into play in December last year, require agrichemical operators to achieve a Certified Handlers Certificate (previously Approved Handler) for Classes 6.1A and 6.1B. Murray and Penny have been working closely with government agencies to become officially accredited to run the Certified Handler courses.  Educhem provides an invaluable service which is extremely important for the safety of growers and consumers.

Murray (or Bearsy as many know him) has been successful in bringing to the New Zealand market a water treatment product for growers to eliminate disease, which can also be used for post wash harvest.  Educhem has, for some time, also been undertaking ground and aerial application calibrations, providing parts & pumps and offering technical support.

I would like to congratulate Murray and Penny on their fantastic new facility and thank them for invaluable services they provide.  Greenhouse growers have certainly reaped the benefits of the Growsafe courses and now with the Approved Handler Certificate being replaced by the Certified Handler Certificate, I am grateful Educhem has made the huge effort to help all growers continue to be certified with new regulations.

I urge all greenhouse growers, ASAP, to contact the team at Educhem to enquire about what course you need to become agrichemical compliant for your business.


Company Profiles:

EDUCHEM:

Educhem provides superior agrichemical training to educate farmers, growers and users in the safe, responsible and effective use of agrichemicals to prevent and manage the adverse effects from agrichemical use for now and future generations by using experienced, professional staff.

Educhem also have Worksafe approved Compliance Certifiers that are able to sign off your Certified Handler or your Compliance Certificate for Hazardous Substances Location.


GROWSAFE Basic

GROWSAFE Standard Certificate

GROWSAFE Advanced (Applied) Certificate

GROWSAFE Registered Chemical Applicators Certificate (Ground spraying contractors)

GROWSAFE Standard (Endorsed Ground Crew) Certificate

GROWSAFE Chemical Rating (Aerial Application for Pilots)- Includes Manned and Unmanned

GROWSAFE Calibrators certificate (calibration of application equipment)

GROWSAFE Courses can be delivered on site or company inhouse 

Certified Handler Certificates for Agrichemicals & VTA's


Preparing company Safety in the Workplace Operating Procedures and plans

Design and advice on the storage of agrichemicals

Auditing of agrichemical application both ground and aerial


AQUASAN INTERNATIONAL:

Aqua San International is the company behind Huwa-San.  Good quality water and overall hygiene management is essential in today’s agribusiness. Huwa-San provides a sustainable way to secure your growth by ensuring your water quality in combination with more efficient fertilization. Huwa-San can be used to prevent infections and biofilm formation in a complete irrigation system: drip irrigation, overhead misting and storage tanks. It is also suitable for disinfection of hard surfaces, materials and even empty greenhouses.

AGHORT SERVICES:

Educhem has moved their ground and aerial application calibrations, supply of parts, including nozzles, and pumps, to their new company, AgHort Services Ltd. Clients can be assured that this new company will still be offering the same technical support as before.


Andrew Baker, local councillor, cuts the ribbon and officially opens the new Educhem building in Tuakau

Murray and Penny with the Educhem and AquaSan International team.


I appreciate your comments.  Please feel free to comment below or on the grower2grower Facebook page:

https://www.facebook.com/StefanGrower2grower/

Article Written by Stefan Vogrincic, Consultant, Grower2Grower